

This guide is containing both the installation and the deployment instruction for version 2. When the PluginPackage deployment model becomes general available from Microsoft, the installation and deployment guides on this page will be adjusted to explain process for each supported platform.
Installation
This article will give you a step by step walk through of getting started with Dynamics 365 plugin development based on
the Kipon.Solid framework. This article assume you are familar with Visual Studio. This guide has NOT been design for
Visual Studio Code. Use the Community, Professional or Enterprise edition instead. The first one
is free and can be downloaded from here:
Download visual studio
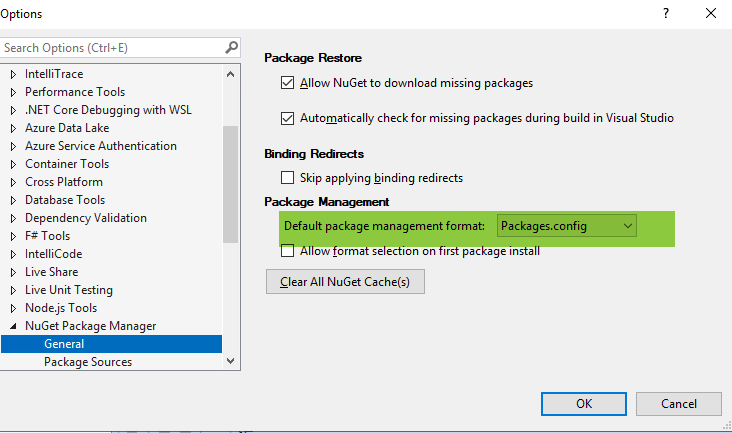
Verify that your default package management format is package.config
the Kipon.Solid nuget package is using content folder for nuget installation. This is not supported in the PackageReference package management format.
Before creating your kipon solid project solution, make sure you have package.config as package management format
In visual studio navigate to:
Tools > Options > NuGet Package Manager > General
Verify that Default package management format is: Package.config
Now we should be ready to start the project setup
Setup Visual Studio project
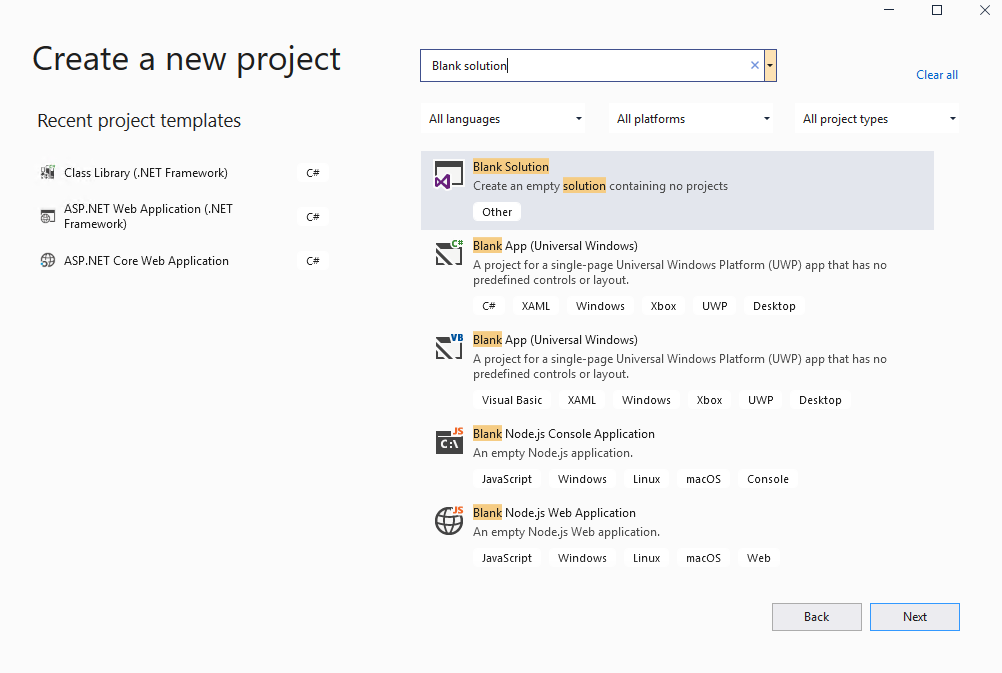
The first thing to do is to open Visual Studio, and create a blank solution:
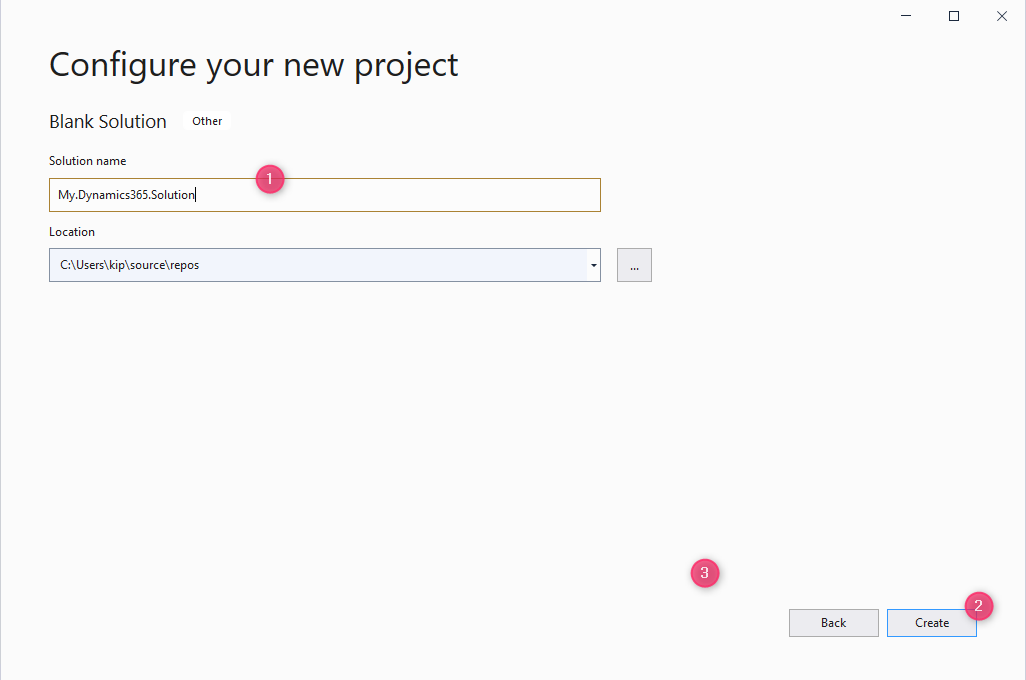
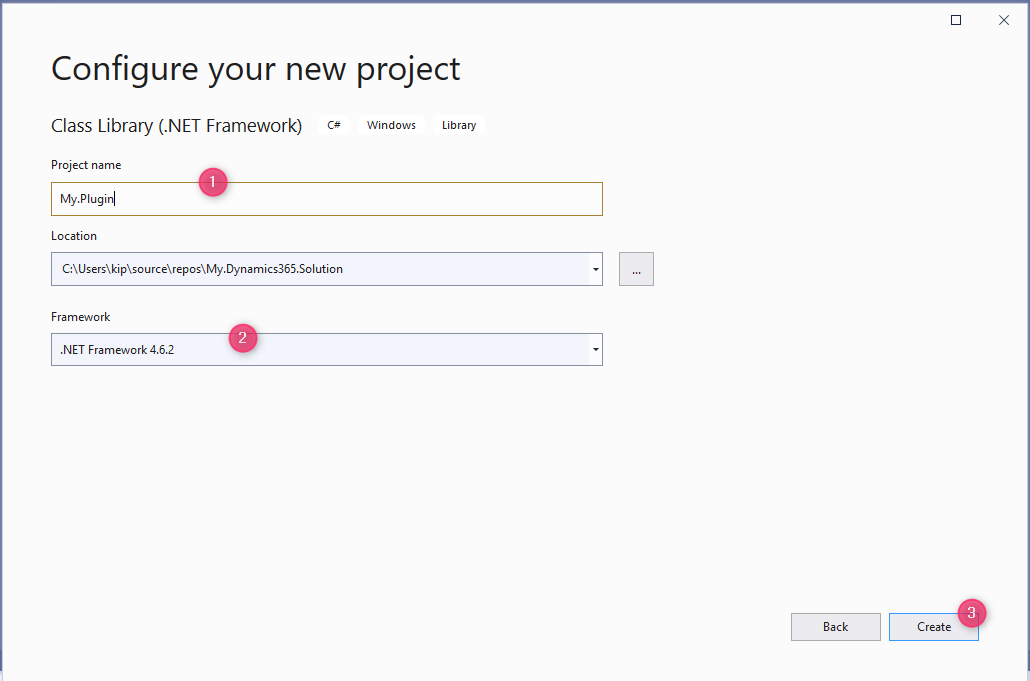
Provide a name and hit Create:
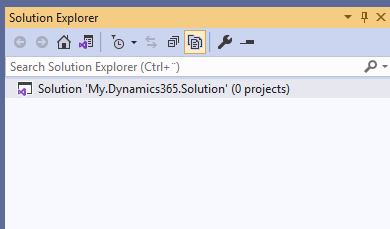
You now have an empty solution
Right click on the Solution line in the solution explore to add a .NET Framework project.
Give your plugin an appropriate name, and select .NET version 4.6.2. For now, that is the highest version supported
by the Dynamics 365 CE Online platform, so don't take it higher than that for now. We will try to keep this info updated
as the Dynamics 365 platform is moving forward.
Push the Create button when you are ready:
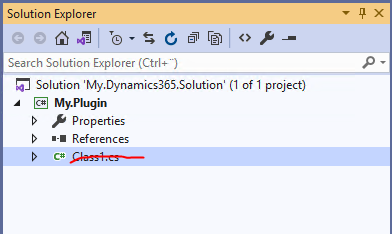
Now your solution has the a .NET Framework class library. Just delete the Default Class1.cs. I never understood why that was added. Everbody is deleting it as the first action in a new project.
Install the Kipon.Solid nuget package
Now go to Tools > NuGet

Navigate to the Browse tab, search for Kipon.Solid.Plugin. Select your library and click Install.(remember to check "include prerelease", otherewise the beta versions will not show up).

Click Ok, and Accept in the popup's from the install project.
This installation has prepared both the needed Microsoft SDK tools for Dynamics 365 CE plugin development, and the tooles related to the Kipon.Solid framework.
Prepare strongly typed entities
After install the Kipon.Solid nuget package, Kipon.Xrm.dll has been added as reference to your project, and the depended Microsoft SDK nuget package has been installed as well, including needed tools.
To take full advantage of the Kipon Solid plugin framework, you need strongly typed objects to represent your datatype. For this we will use the crmsvcutil tool provided by the Microsoft SDK, but the tool has been extended with new cababilities, so please follow below process to configure and generate strongly typed proxy classes for the entities you need:
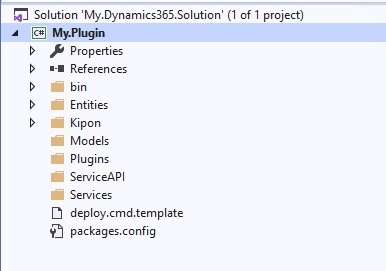
You project now have a folder called "Entities":
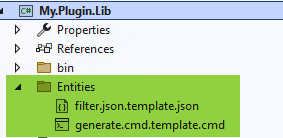
As you can see, two files has been added to the entities directory. copy both files to new files in same folder, but without ".template.json" and ".template.cmd" suffix. This suffix has been added to avoid the files to be overridden, and at same time enable easy distribution of working configuration examples. Create a copy instead of rename so you have the template file for later easy reference when you need to add different type of functionality later.
Entities\filter.json
{
  "supress-mapped-standard-optionset-properties": true,
  "entities": [
    {
      "logicalname": "account",
      "servicename": "Accounts",
      "Optionsets": [
        {
          "id": null,
          "logicalname": "preferredcontactmethodcode",
          "multi": false,
          "name": "PreferredContactMethodCode",
          "values": [
            {
              "name": "Any",
              "value": "1"
            },
            {
              "name": "Email",
              "value": "2"
            },
            {
              "name": "Phone",
              "value": "3"
            },
            {
              "name": "Fax",
              "value": "4"
            },
            {
              "name": "Mail",
              "value": "5"
            }
          ]
        }
      ]
    },
    {
      "logicalname": "contact",
      "servicename": "Contacts"
    },
    {
      "logicalname": "opportunity",
      "servicename": "Opportunities",
      "Optionsets": [
        {
          "id": "budget",
          "logicalname": "budgetstatus",
          "multi": false,
          "name": "Budgetstatus",
          "values": null
        }
      ]
    },
    {
      "logicalname": "lead",
      "servicename": "Leads"
    },
  ],
  "optionsets": [
    {
      "id": "budget",
      "name": "BudgetEnum",
      "values": [
        {
          "name": "NoCommittedBudget",
          "value": "0"
        },
        {
          "name": "MAyBuy",
          "value": "1"
        },
        {
          "name": "CanBuy",
          "value": "2"
        },
        {
          "name": "WillBuy",
          "value": "3"
        }
      ]
    }
  ],
  "actions": [
    {
      "logicalname": "QualifyLead",
      "name": "QualityLead"
    }
  ]
}
If you already have a filter.xml file from version 1, just leave or dump it in there, it will be converted to json on your first generation of strongly typed entities with version 2. of the Kipon tools. In this case, make sure you do not have a filter.json, because that will be used if present.
The template file need to be adjusted. it has been setup to demonstrate the capabilities of the Kipon.Solid framework. There are 3 main sections in the json file "entities" to define the part of the CRM datamodel we need to work with, "optionsets" to map global optionsets to enums in the code, and finally "actions" to get interfaces and response proxy classes to listen to Dynamics 365 Actions. To get details on these elements, please refer to the Api section. For now, we will just reduce the configuration to a minimum to get started:
{
  "entities": [
  ],
  "optionsets": [
  ],
  "actions": [
  ]
}
With above configuration in place, as a file name "filter.json" in the Entities folder, we are now ready to prepare the proxy generate tool. You have already renamed the generate.cmd.template.cmd file to "generate.cmd". Open this file, and search for "[Set ...]" and insert appropriate values.
- [Set connectionstring]: Insert appropriate connection string to your Dynamics 365 CE developer instance.
- [Set context Name]: You can name your Dynamics 365 entity model context. If you work 100% SOLID, according to the princips defined, you will never work directly on the generated context. You will instead work on unit-of-work interfaces, so the name is not important.
- [Set namespace]: Insert appropriate namespace for you library.
To see how you build up the connection string for your instance, you can diig deep in in this article:
Dynamics 365 CE connection strings
This is the result for my on-prem example development instance:
@echo off
..\bin\coretools\CrmSvcUtil.exe "/connectionstring:AuthType=ClientSecret; url=https://yourinstance.crmNN.dynamics.com; ClientId=[clientGuid]; ClientSecret=Shhhhhhhhhh" "/out:Context.design.cs" "/ServiceContextName:PluginExampleContextService" "/namespace:Kipon.PluginExample.Entities" "/codewriterfilter:Kipon.Xrm.Tools.CodeWriter.CodeWriterFilter,Kipon.Xrm.Tools" "/codecustomization:Kipon.Xrm.Tools.CodeWriter.PluginCustomizeCodeDomService,Kipon.Xrm.Tools" /generateActions
Now open a command prompt, navigate to the directory where the generate.cmd file is hosted, and start the generate.cmd

The tool should generate something like above.
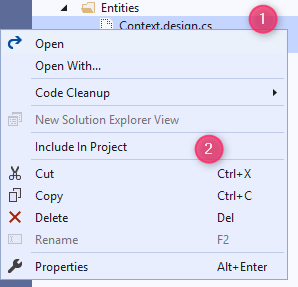
This tool has added two files to the Entities directory that you need to include in your Visual Studio solution:
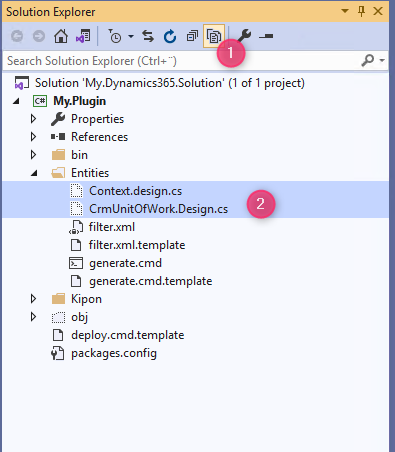
Select the two files, right click, and select include in project
You are ready.
Ready to go
You are ready to start build plugins. Try build your solution to make sure everything is in place. There should be no errors.
To start SOLID and stay SOLID, it is a good idea to get a basic structure for your code in place first. The Kipon.Solid framework has already giving you the first part of the structure, the "Entities" folder, where you should put code that are directly related to the Dynamics 365 CE entity model. All entity proxy classes has been generated as "partial" so you can add additional functionality by creating your own source files, and declare the same classes "again", with the partial flag in the class definition. Such extension of an entity should be placed in the Entities folder or in a substructure below the Entities folder depending on the size of your library
<
Beside the Entities folder, i recommend the following basic structure
- Models: Put cross entity interfaces and abstractions here. A model class in a Dynamics 365 plugin context is typicall an interface that defines the explicit hooks that are needed on the underlying entity to solve a task.
- Plugins: Here you should put your plugins. A plugin is the code that maps from an event to a service. If you plan to do a lot of plugins, create a folder for each entity and each action to listen for.
- ServiceAPI: Put all service interfaces here. Remember, to stay SOLID, all dependencies should rely on abstractions and interfaces, not on implementations. In this folder you define the interfaces that is needed to solve an assignment.
- Services: Projects developed with SOLID princips as foundation will often put interfaces in one assembly, while implementation in another. In this prerelase of the library, any service implementation must be within the plugin library. We will remove this constrain and allow service api and service to be implemented in separate libaries, hopefully before final release.
Create nuget package
The purpose of version 2 of Kipon.Solid.Plugin is to support the PluginPackage deployment model of Dynamics 365 CE, however the tools does not provide any support to actually create that package. There are many supported ways of creating a nuget package, so here comes a guide doing the very basic. You can freely choose other approach for creating the package.
First you will need the nuget package tool. You can download it from here:
Download nuget package tool
Now open a command prompt and place your self in the root folder of you plugin library and type:
nuget specThis will generate a default nuget specification file, you need to adjust it according to your setup.
Below an example of the minimum nuget spec file needed:
<?xml version="1.0" encoding="utf-8"?>
<package>
	<metadata>
		<id>Kipon.PluginExample</id>
		<version>1.0.0.5</version>
		<title>Example plugin for using Kipon Solid plugin framework to build plugins</title>
		<authors>Kjeld Ingemann Poulsen</authors>
		<requireLicenseAcceptance>false</requireLicenseAcceptance>
		<license type="expression">MIT</license>
		<projectUrl>https://kipon.dk/solidplugin</projectUrl>
		<iconUrl>http://www.kipon.dk/layouts/kjeld/cow.png</iconUrl>
		<description>Test Plugin Library - based on nuget based deployment model to Dynamics 365 CE</description>
		<releaseNotes>None</releaseNotes>
		<copyright>Copyright Kipon ApS 2019,2020,2021,2022,2023</copyright>
		<tags>Dynamics 365 plugin C# SOLID</tags>
	</metadata>
	<files>
		<file src="bin\debug\Kipon.Xrm.dll" target="lib/net462" />
		<file src="bin\debug\Kipon.PluginExample.dll" target="lib/net462" />
	</files>
</package>
You need at least to add the Kipon.Xrm.dll and your own plugin. If your plugin library require any other assemblies, ex Json.Net or similar, you need to add these as well.
Be aware of the following limitations in the first version of Kipon Solid Plugin framework, using PluginPackage deployment model:
Now you are ready to create your package. Simply type:
nuget pack [nuget-spec-filename]This will generate a file with the name structure [name-of-package].[version].nupkg, ex. Kipon.ExamplePlugin.1.0.0.nupkg, and that is the file that will be uploaded to Dynamics 365 CE
Deploy
The Kipon Solid Plugin tool is build on "DUCK TYPE PATTERN" to allow the deployment tool to recognize and setup the plugins within the Microsoft Dynamics 365 CE platform.
Normally you would use the Microsoft provided tool for this. The SDK tool provide a nice ui, where you basically load the nuget package, and then defines steps, filter, and images, - and this is the real problem of that appraoch. Defining steps, filters and images has to be done manually, and there is no way to guarantee that your registrations match the actual code.
Understanding the deployment model of the tool. The Kipon.Solid.Plugin framework is bridging that gab by providing a tool that performs an analyze of your nuget package, upload the codes to Dynamics 365 CE PluginPackage, and based on your actual code, it will registre steps, filters and images, according to your code
With a deployment tool like this in place, you can take the overhead of being more delcaretive in your design approach (write interfaces for everything), because the declarations will not only be used compiletime when you write and validate your code, it will also be used on deployment to setup the correct steps.
Go do - deploy
Configuration the Kipon.Xrm.Tools. From version 2. you need to configure tools, using a json configuration file. Each tool in the Kipon.Xrm.Cmd tool box has a set of parameters you define in this file. Plugins are no exception. You can place the kipon-tools.json configuration file anywhere, and name i as you like, because you will need to parse the path as command line parameter to ko.exe (Former Kipon.Xrm.Cmd).
Here is an example of the configuration file:
{
  "connectionString": "AuthType=ClientSecret; url=https://[your instance].crm4.dynamics.com; ClientId=[client id]; ClientSecret=[shhhhh]; Tenentid=[tenentid]",
  "solution": "mysolution",
  "plugin": {
    "name": "Kipon.PluginExample",
    "spec": "Kipon.PluginExample.nuspec",
    "package": "Kipon.PluginExample.$version.nupkg"
  }
}
As you can see above, you need to add the connection string in here, point to the solution where things should be deployed, and finally in the plugin json instance, define the nuget spec file to be used, and the nuget package file to be uploaded. In the nuget package filename, you can specify $version. That way you only need to specify version within in the nuget spec file.
Installing the Kipon.Solid.Plugin framework, placed a [deploy.cmd.template.cmd] file in the root of your plugin project. You need to adjust this file reference to the configuration file. You should also rename or copy the file to deploy.cmd to avoid overwriting you settings when upgrading Kipon Solid Plugin to newer versions.
@echo off
call nuget pack [full path to nuget-spec-file]
call "bin\coretools\ko.exe" "deploy" "/config:[full path and name to config file, .\kipon-tools.json]"
First rename the file, to deploy.cmd (remove .template.cmd)
Secondly:
- Replace [full path to nuget-spec-file] with you nuget spec file and ensure that nuget.exe is within your exe path
- Replace [full path and name to config file, .\kipon-tools.json] file path to the kipon-xrmtools.json configuration file
© Kipon ApS 2020 - 2025. All content on the page is the property of Kipon ApS. Any republish or copy of this content is a violation. The content of this
site is NOT open source, and cannot be copied, republished or used in any context without explcit permission from the owner.